Key Takeaways
Replacing the eMMC with an SSD will provide better read and write speeds. Ensure you back up your data before starting the replacement process. Follow this guide to safely replace your eMMC and install an SSD on your Steam Deck.
Upgrading your Steam Deck’s internal storage by replacing the eMMC drive with an SSD can significantly enhance its performance.
This guide provides a comprehensive step-by-step process, from removing the eMMC to installing an SSD and setting up the operating system.
By the end of this article, you’ll have a faster and more responsive Steam Deck.
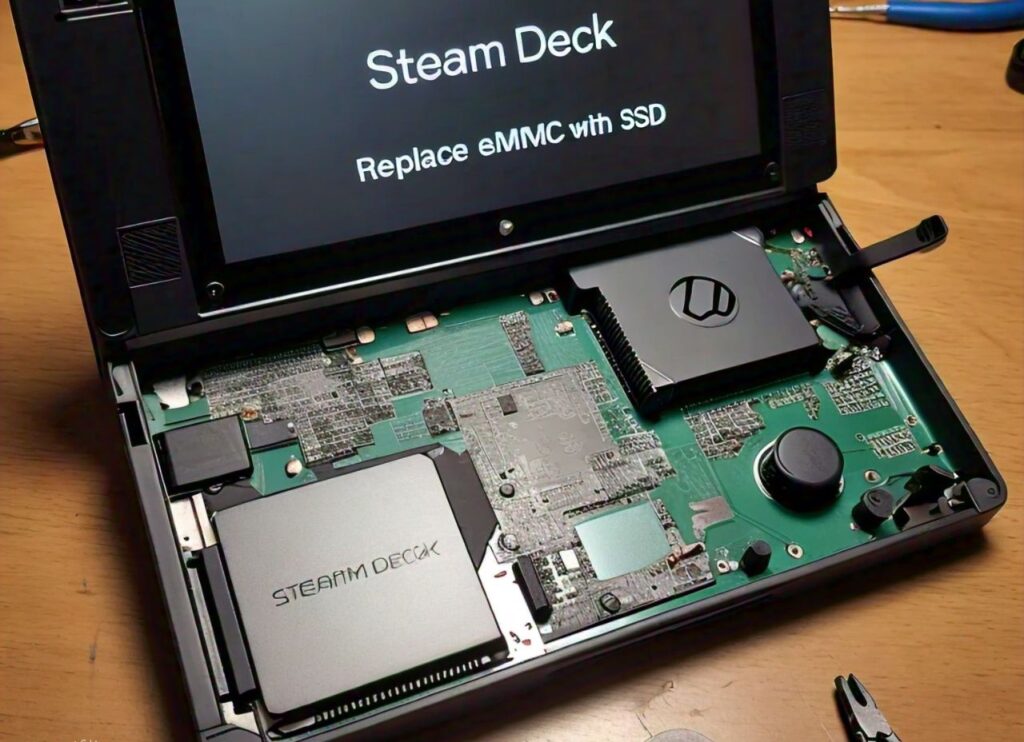
Step-by-Step Guide to Replacing eMMC with SSD
Upgrading the Steam Deck’s storage is a popular choice for users looking to improve speed and storage capacity.
This section outlines the necessary tools and steps required for replacing the eMMC with an SSD.
1. Why Upgrade from eMMC to SSD?
The Steam Deck comes with an eMMC (Embedded MultiMediaCard) as its default storage for lower-end models.
However, eMMC has slower read and write speeds compared to an SSD (Solid State Drive). Upgrading to an SSD will offer:
- Faster game load times
- Improved system performance
- Larger storage capacity options
2. Tools You Will Need
Before starting the replacement process, gather the following tools:
- A Phillips head screwdriver (size PH00 or PH0)
- Plastic spudger (for safe prying)
- Anti-static wrist strap (to prevent damage from static electricity)
- Compatible NVMe M.2 SSD (2230 size)
- USB drive (for the operating system installation)
- External SSD enclosure (optional for data transfer)
How to Remove eMMC and Install the New SSD?
Follow these steps carefully to remove the existing eMMC and install the SSD in your Steam Deck.
1. Back Up Your Data
Before you begin, make sure to back up all important data. You can use an external drive or cloud storage to save your files.
Replacing the eMMC will erase all existing data.
2. Power Off and Disconnect the Steam Deck
Shut down your Steam Deck and disconnect any connected cables or accessories.
This is crucial for safety and preventing any damage to the device.
3. Open the Back Cover
- Use the Phillips head screwdriver to remove the screws from the back cover of the Steam Deck.
- Carefully use the plastic spudger to pry open the back cover. Start from the edges and work your way around to avoid damaging the clips.
4. Locate and Remove the eMMC
- Once the back cover is removed, locate the eMMC storage on the motherboard.
- Gently detach the eMMC by releasing the clip holding it in place.
- Carefully lift the eMMC out of its slot.
5. Install the New SSD
Now that the eMMC is removed, it’s time to install the new SSD.
- Align the NVMe M.2 SSD (2230 size) with the slot on the motherboard.
- Gently insert the SSD into the slot at an angle, then press it down and secure it with the screw.
- Double-check that the SSD is properly seated and secured.
Installing the Operating System on the New SSD
After installing the new SSD, the next step is to install an operating system to make your Steam Deck functional again.
1. Prepare the Operating System on a USB Drive
To install the operating system, you will need a bootable USB drive. Follow these steps:
- Download the SteamOS recovery image from the official Steam website.
- Use a tool like Rufus or Balena Etcher to create a bootable USB drive with the SteamOS image.
- Plug the USB drive into your computer and follow the instructions to prepare it.
2. Boot from the USB Drive
- Connect the bootable USB drive to your Steam Deck.
- Power on the Steam Deck while holding the Volume Down button to access the boot menu.
- Select the USB drive from the boot options.
3. Install SteamOS on the New SSD
- Follow the on-screen instructions to install SteamOS on your new SSD.
- Choose the installation option that suits your needs (clean install is recommended).
- Wait for the installation process to complete. This may take some time depending on the size of the SSD.
4. Set Up Your Steam Deck
Once the installation is complete, you will need to set up your Steam Deck.
- Follow the initial setup prompts, including connecting to Wi-Fi and logging in with your Steam account.
- Restore any backed-up data if necessary.
- Reinstall your games and applications.
Troubleshooting Tips
Even with careful preparation, issues can arise during the process. Here are some common problems and their solutions:
1. SSD Not Detected
If your Steam Deck does not detect the new SSD:
- Ensure the SSD is properly seated in the slot.
- Try restarting the Steam Deck and accessing the boot menu again.
- Check if the SSD is compatible with the Steam Deck (2230 size is required).
2. Operating System Fails to Install
If the SteamOS installation fails:
- Recreate the bootable USB drive using a different tool.
- Check the USB drive for any errors.
- Make sure you have downloaded the latest SteamOS recovery image.
3. Steam Deck Freezes or Crashes
If the Steam Deck freezes or crashes after installing the SSD:
- Verify the SSD is securely installed.
- Update the firmware of your Steam Deck if necessary.
- Reset the Steam Deck to its factory settings.
FAQs
Q1: Can I use any SSD to replace the eMMC on the Steam Deck?
No, you must use an NVMe M.2 SSD in the 2230 form factor. Other sizes may not fit properly in the Steam Deck.
Q2: Will replacing the eMMC with an SSD void my warranty?
Yes, opening the Steam Deck and replacing internal components like the eMMC may void the warranty. It is recommended to check the warranty terms before proceeding.
Q3: How much faster is the Steam Deck with an SSD compared to eMMC?
An SSD generally offers significantly faster read and write speeds compared to eMMC, resulting in faster boot times, reduced loading times for games, and smoother overall performance.
Q4: Is it difficult to replace the eMMC with an SSD on the Steam Deck?
While it does require some technical knowledge, following a step-by-step guide can make the process manageable for most users.
Q5: Can I revert back to the original eMMC after installing the SSD?
Yes, you can reinstall the original eMMC if needed. Simply follow the same steps in reverse and reinstall SteamOS on the eMMC.
Conclusion
Upgrading your Steam Deck by replacing the eMMC with an SSD can provide a significant boost in performance and storage capacity. Although the process requires some technical skill, following a detailed guide makes it manageable for most users.
Remember to back up your data before starting, and take your time to ensure everything is done correctly.
With your new SSD installed, you can enjoy faster load times and an enhanced gaming experience on your Steam Deck.
Leave a Reply